Introduction
本文說明如何使用 MPLAB 建立一個新專案。
Highlights
本文討論下列項目:
- Creating a New Project
- Building the Project
- Programming the Device
- Running the Program
看完本文後,你將可以完成下列工作:
- 使用 Project Wizard 建立 Project
- Assemble and link the code, and set the Configuration bits
- Program the chip and run the program
Creating a New Project
第一步是在 MPLAB IDE 裏建立 Project 跟 Workspace. 通常一個 workspace 裏只會有一個 project。
- 一個 Project 包含建立應用程式所需的檔案,如 source code, header files, library 等,以及編譯 project 的選項設定。
- 一個 Workspace 包含一個或多個 projects, 所用的 device 資訊, debug/programmer 工具, 以及 MPLAB IDE 的 Configuration settings 等
MPLAB IDE 裏有一個叫做 Project Wizard 的工具可以用來建立新 Project。
建立新 Project 會涉及下列工作:
- Task 1, Select a Device
- Task 2, Select the Language Toolsuite
- Task 3, Name Your Project
- Task 4, Add Files to Your Project
- Task 5, Confirm the Configuration Settings
- Task 6, Build the Project
- Task 7, Program the Device
- Task 8, Run the Program
Task 1, Select a Device
- 啟動 MPLAB IDE
- 點選 Project>Project Wizard… 以啟動專案精靈
- 在 Welcome Window 中,按下一步,Project Wizard Step One 視窗就會顯示在畫面上:
- 在 “Device” 下列選單中,選擇 MCU,例如“PIC18F46K20”
- 按下一步,Project Wizard Step Two 視窗就會顯示在畫面上:
Task 2, Select the Language Toolsuite
- 在 “Active Toolsuite” 下拉選單中,點選 “Microchip C18 Toolsuite”。這個工具組包含了我們將使用到的 compiler, assembler 與 linker。如果 “Microchip C18 Toolsuite” 不在下拉選單中,請點一下 “Show all installed toolsuite” checkbox。
- 按下一步繼續,Project Wizard Step Three 視窗就會顯示在畫面上:
Task 3, Name Your Project
- 在 “Create New Project File” 欄位中輸入 C:\MyProjects\BlinkLED\BlinkLED
- 按下一步繼續。Project Wizard Step Four 視窗就會顯示在畫面上(註:Windows 會跳出一個 dialog,說 C:\MyProjects\BlinkLED 資料夾不存在,問你要不要建立,此時請按確定):
Task 4, Add Files to Your Project
目前沒有 .c 程式檔,這步可跳過。
- 按下一步繼續
- 在 Summary 視窗上按下完成,一個新的 Project 跟 Workspace 就產生了。其中:
- BlinkLED.mcw 是 workspace 檔
- BlinkLED.mcp 是 Project 檔
- 點 File>New 建立一個新檔
- 點 File>Save As… 把檔案存起來,命名為 blinkLED.c,放在 C:\MyProjects\BlinkLED 資料夾裏
- 接著把底下的範例程式碼複製到 blinkLED.c 裏
-
在 Project window 中, 在 Source Files 資料夾上按右鍵,如下圖,點 Add Files,然後選取 blinkLED.c 把檔案加到 Project 的 source directory 裏:
-
點 Programmer>Select Programmer>MPLAB ICD2,此時 Output window 會顯示 “Target Device PIC18F46K20 found, revision = xxx ” 的訊息,代表已正確連上 PIC18F46K20 MCU, 如下圖 (若找不到 Device,請確認板子有正確連接到 PC):
Task 5, Confirm the Configuration Settings
-
點 Configure>Configuration Bits,確認 Configuration bits 的設定是正確的。下圖是一般的設定(詳細請參考 PIC18F46K20 DataSheet):
請注意!通常我們會在 Code 裏設定 Configuration bits,如果不是,而是要在這個視窗設定,就必須取消勾選 “Configuration Bits set in code” 這個選項。
Task 6, Build the Project
-
點 Project>Build Options…>Project>Directories, 在 “Show directories for” 下拉選單中,選 Library Search Path,按下 New 按鈕,接著輸入 C18 的 lib 資料夾路徑,如下圖:
- 點 Project>Make, Output window 就會顯示在畫面上,如下圖
- 注意編譯的過程,當你看到 “BUILD SUCCEEDED” 的訊息時,代表已準備好可以燒錄程式了。
Task 7, Program the Device
-
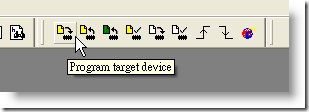
在 Program Toolbar 上,點 Program target device 鈕:
-
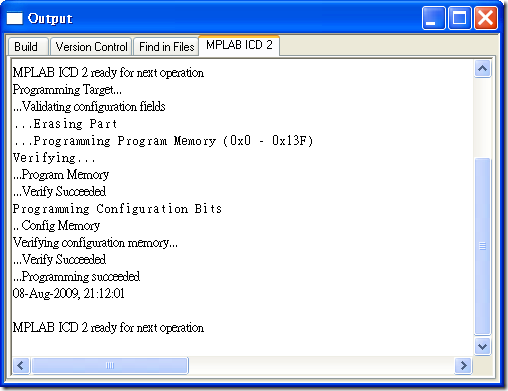
如下圖,在 Output window 中,注意 output 的訊息,若看到 “Programming Succeeded” 表示燒錄已完成:
Task 8, Run the Program
-
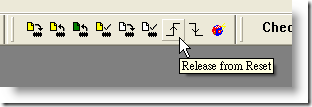
按下 Program Toolbar 上的 Release from Reset 開始執行程式:
此時板子上的 LED 若有閃爍,代表程式已成功執行。 (註:LED 接在 RA4 腳位)


0 意見:
張貼留言